Step by Step: How to Align Your Aftermarket Headlights for Maximum Visibility
Light the Way: Perfect Your Headlight Alignment
Every car enthusiast knows that upgrading to aftermarket headlights isn’t just about turning heads, it’s about seeing the road clearly, driving with confidence, and avoiding the dangers of outdated headlights.
We all know that proper headlight alignment plays a crucial role in achieving both form and function. A misaligned beam can make even the most advanced lighting setup ineffective, reducing visibility and increasing the risk of glare for oncoming drivers.
So, even if you’re not a do-it-yourself kind of car owner, you should know how to adjust projector headlights. The need for it will likely arise, and it’s better to understand how to align them properly to avoid any accidents.
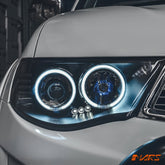
Getting the headlights right is the only solution to all these problems—and thankfully, at Mars Performance, we’re here to help. We’ll walk you through why alignment matters, how it impacts safety and style, and what you can do to get the best out of your Mars Performance lighting system.
Why Headlight Alignment Matters More Than You Think
As drivers, it’s easy to understand why headlight alignment matters since it’s crucial for safety, improving your ability to see the road, and preventing glare for other drivers.
You don’t want to put your passengers in danger, which is why fixing misaligned headlights is essential. Poor alignment reduces visibility, making it harder to spot hazards like pedestrians or obstacles ahead. It can also blind oncoming traffic, and worse, it puts unnecessary strain on your eyes as they constantly adjust between bright and dim patches of light, with all the combination of the mentioned can easily lead to accidents.

You shouldn’t wait for a crash to realise how important alignment is, especially when driving at night. Every responsible driver knows that proper lighting is key to a safe drive. Ensuring your headlights are aligned correctly helps you see farther, react faster, and protect everyone on the road, especially yourself.
What You’ll Need
Before you begin, gather the necessary tools to ensure you’re set up for success. Park your vehicle on a flat surface, turn off the engine, and disconnect the battery to avoid electrical issues or injury. Here’s a list of typical items you’ll need:
- Aftermarket headlight unit(s) compatible with your vehicle
- Basic tool kit: screwdrivers, socket set, ratchet, and trim-removal tools
- Torque wrench (if required for mounting bolts)
- Masking tape for marking aim lines
- Measuring tape or ruler
- Flat surface and vertical wall for alignment (e.g., level driveway or garage)
- Service or owner’s manual for aim specifications and adjustment screw locations
- Safety gear: gloves and safety glasses
- Towel to cover the headlight not being adjusted
-
Optional: dielectric grease and contact cleaner
Step-by-Step Guide to Aligning Your Aftermarket Headlights
Now, let’s get started with the actual process:
Step 1: Preparation & Vehicle Setup
1. Park on level ground, facing a wall or garage door about 3–5 m away (consult your local aim spec).
2. Ensure vehicle is on a flat surface, tyres inflated and vehicle empty of extra load, unless you normally carry passenger/gear.
3. Disconnect the battery (negative terminal) to avoid electrical shorts while working with wiring.
4. Remove the factory headlight unit:
-
-
- Open hood and locate mounting bolts, clips, wiring harnesses.
- Remove trim or parts if required to access headlight housing because some vehicles require bumper or grille removal.
- Disconnect the wiring harness carefully.
- Remove mounting bolts and pull out the unit.
-
5. Inspect the wiring connector, housing, and ensure no corrosion, damage or missing seals.
6. Clean or apply dielectric grease as needed.
Step 2: Fitting the Aftermarket Headlight Unit
1. Compare the new unit to the old: Make sure mounting points align, harness connectors match or adapt as needed.
2. Install any included brackets or adapters (per Mars Performance instructions).
3. Mount the headlight unit loosely: Insert mounting bolts by hand to allow slight movement for final alignment.
4. Reconnect wiring harness:
-
-
- Ensure polarity and connectors match.
- Double-check for correct bulb types, daytime running lights (DRLs), turn signals, and if the unit includes sequential indicators or integrated LED elements.
- Turn on the headlight (low beam) to verify correct operation before tightening mounting bolts.
- Firm up mounting bolts: Use correct torque values (check vehicle service manual or Mars Performance spec) to ensure no movement later.
-
Step 3: Aiming & Alignment
Proper aim is crucial for performance & compliance. Here’s how:
1. Mark the wall:
-
-
- Drive the vehicle so the front is ~3–5 m from a wall.
- Measure the height from the center of the headlight to the ground. On the wall, mark a horizontal line at that height with masking tape.
-
Also mark the vertical centre-line of the vehicle on the wall.
-
2. Turn on low beam: With the vehicle on level ground and engine at normal ride height, turn on the low beam.
3. Check beam pattern:
-
-
- The brightest portion of the beam should sit just below the horizontal line (about 100 mm below for many vehicles) and slightly to the right of the vertical centre (in RHD vehicles) or left (in LHD).
- If the beam patter appears high, low, or angled, adjustment is needed.
-
4. Use adjustment scream:
-
-
- Most headlight housings allow vertical and horizontal aim adjustment via screws/bolts.
- Adjust until the beam cut-off or hotspot aligns with the marked lines.
- Some aftermarket units from Mars Performance may include specific referencing/aiming instructions so always refer to their installation sheet.
-
5. Re-check operation:
-
-
- With the adjustment done, test on low beam, high beam, turn signals, DRLs (if applicable). Ensure alignment remains correct with each mode.
-
For sequential indicators or LED elements, verify correct operation and legal compliance (some jurisdictions regulate dynamic indicators).
-
Step 4: Final Checks & Compliance
- Seal and refit all trims: Ensure the headlight unit is sealed properly from moisture and dust for longevity.
- Check wiring routing: Secure any loose wires, avoid heat sources (exhaust manifold, turbo), and use zip-ties or loom where needed.
- Test drive: With lights on, drive in a safe area at night and check visibility, beam pattern on road, and ensure no glare to oncoming traffic.
- Document & label: If required by local regulation (for modified vehicles), keep records of the headlight unit spec, the supplier (Mars Performance), and aim adjustment for inspection.
Step 5: Repeat on the Other Side
Make sure to repeat the same process on the opposite headlight. Follow each step carefully to ensure both sides are adjusted evenly and aimed at the same height and distance. Double-check your alignment marks and verify that the light beams are consistent and symmetrical. Take your time to align both headlights and to assure that you’re doing it the right way.
Why Choose Mars Performance for Your Headlight Upgrade
If you’re looking for premium aftermarket car parts in Melbourne, what are you waiting for? Get your aftermarket parts from Mars Performance and you won’t regret it. For visual guidance, you can check out Mars Performance’s YouTube channel, where they showcase different models of their headlights that will surely fit your car.

Each unit is built to enhance visibility, improve night-time safety, and transform your vehicle’s front-end look. Our products are tested for durability, compliance, and long-term reliability, ensuring they meet Australian road standards while offering the premium style enthusiasts demand.
A fender bender might seem minor, but ignoring headlight alignment afterward can put you and others at risk. Mars Performance doesn’t want that for you, our headlights ensure your car remains roadworthy and safe to drive.
Light the Way with Mars Performance
Upgrading your headlights is an exciting modification, but it’s only as good as the installation and alignment. By following this step-by-step guide, you’ll not only fit new lights but also set them up for optimal performance, safety, and compliance. Whether it’s better visibility during night drives or a sharper look for your ride, the right approach makes all the difference.
Remember, having properly aligned headlights isn’t just about avoiding fines, it ensures everyone’s safety on the road.
Shine bright and drive right with Mars Performance headlights!
Frequently Asked Questions (FAQs)
Q: How often should I check my headlight alignment?
A: You should check your headlight alignment at least once a year or whenever you notice uneven lighting, glare, or poor visibility. It’s also recommended after suspension changes, collisions, or headlight replacements, even small shifts can affect your beam pattern.
Q: Can I align aftermarket headlights myself?
A: Yes, many Mars Performance headlights are designed with plug-and-play compatibility, making DIY alignment possible. With the right tools, a flat surface, and a vertical wall, you can follow simple steps to align them correctly. However, if you’re unsure or notice persistent misalignment, have a professional check it for accuracy.
Q: What tools do I need for headlight alignment?
A: You’ll need a screwdriver, measuring tape, masking tape, and access to a flat surface and vertical wall for proper aiming. For precision adjustments, a torque wrench or headlight aiming tool can also help. Always refer to your vehicle’s service manual for alignment specifications.
Q: What are the signs of misaligned headlights?
A: Common signs include uneven light patterns, poor visibility, other drivers flashing their high beams at you, or one beam appearing higher than the other. These symptoms usually mean your headlights need realignment to restore proper illumination and safety.
Q: How do I know if my aftermarket headlights are properly aligned?
A: Properly aligned headlights will illuminate the road evenly without glaring into oncoming traffic. You can test alignment by parking near a wall on level ground and adjusting until the beams fall slightly below eye level and to the right (for right-hand drive countries).
Q: Will aftermarket headlights fit every vehicle model?
A: Aftermarket headlights vary in fit and compatibility of a car. Always check product specifications and ensure the headlights are made for your specific make, model, and year to guarantee proper fitment and electrical compatibility.







Leave a comment
Please note, comments need to be approved before they are published.